2 working methods to fix This PC can’t run Windows 11
- Admin
- Aug 10, 2021
- 4 min read
Getting error This PC can’t run Windows 11 while trying to install the latest windows 11 preview build on your computer? You are not alone, several users report This PC can’t run Windows 11 error even their computer meets Windows 11 system requirements. This error usually occurs because of two reasons, Unified Extensible Firmware Interface (UEFI) Secure Boot is disabled or Trusted Platform Module (TPM) is disabled or the TPM version is too old (Minimum requirement for Windows 11 is TPM 2.0). And in order to install the latest Windows 11 preview builds on your computer, you must fix both or one of errors. Keep reading the article to resolve this pc can’t run Windows 11 error.
Before go ahead let’s first understand what is UEFI secure boot and Trusted Platform Module (TPM) which mainly causing the error This PC can’t run Windows 11.
What is UEFI secure boot and TPM
UEFI is very similar to BIOS and is essential for connecting a computer’s firmware to its operating system. Secure Boot is a set of programs that check whether your operating system is secure for running on a machine. And installing Windows using the newer UEFI mode is recommended as it comes with more security features such as Secure Boot than the legacy BIOS mode.
Trusted Platform Module, or TPM, is a unique hardware-based security solution that installs a cryptographic chip on the computer’s motherboard, also known as a cryptoprocessor. The job of the TPM chip is to encrypt data that’s being transmitted from and to the computer. Microsoft explains more about TPM on their support site here.
Contents
Windows 11 system requirements
Unlike Windows 10, which was specifically designed to run on older hardware, Windows 11 requires relatively new hardware and will not install on older PCs. Microsoft official has published the minimum system requirements for Windows 11 as follows:
Processor: You need to have a processor or System on a Chip (SoC) with at least 1GHz clock speed, two cores, and 64-bit architecture.
Memory: Your computer must have at least 4GB of RAM to be able to run Windows 11.
Storage: 64GB is the minimum storage your PC needs to have.
System firmware: UEFI, Secure Boot capable.
TPM: Trusted Platform Module (TPM) version 2.0.
Graphics card: Microsoft recommends DirectX 12 compatible graphics cards with WDDM 2.x for Windows 11.
Display: Your PC needs to have at least a 9-inch screen with HD (720p) resolution.
Internet connection: Microsoft account and internet connectivity required for setup of Windows 11 Home.
This PC can’t run Windows 11
If you are facing the “This PC Can’t Run Windows 11” error even after meeting these requirements, then the issue is with the Secure Boot or TPM 2.0 settings of your PC. Let’s check how we can fix the error quickly so that you can install the Windows 11 update on your PC.
Enable UEFI secure boot
Let’s first check if Secure Boot is enabled on your computer, to do this:
Press Windows key + R, type msinfo32 and click ok,
Now locate secure boot state and check its status. If it’s not enabled then Enable UEFI secure boot following the steps below.

First, close all open programs and Shut down your computer.
Reboot it and during startup, open the BIOS or UEFI menu by pressing F1, F2, F10, F11, DEL (Note: The key varies depending on the manufacturer)
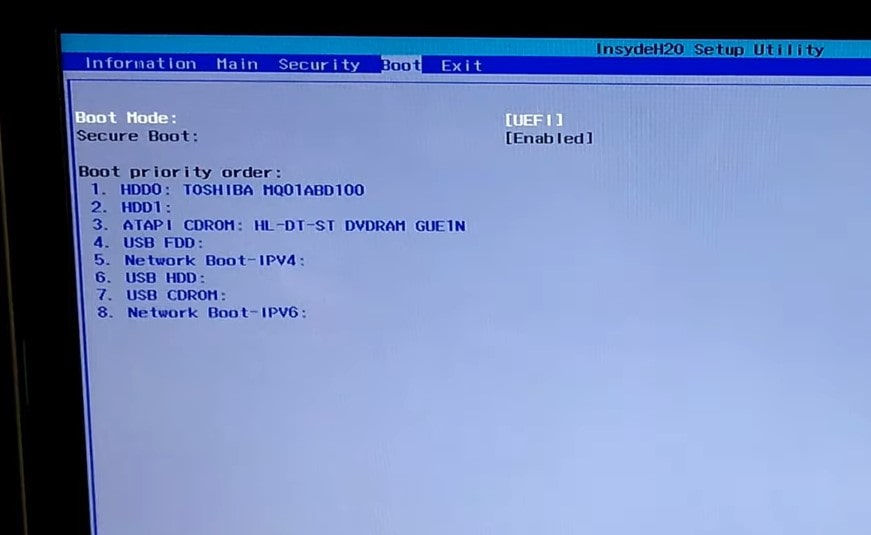
In the BIOS setup utility move to the boot tab using arrow keys on the keyboard then highlight boot mode, and check if it’s set to legacy.
To change the boot mode highlight the boot mode option then press enter key, now choose UEFI from the options. (Use the up and down arrow keys to select UEFI and hit enter to select the option.
Now highlight the secure boot option using the arrow key and hit the enter key, and finally, enable Secure Boot on your PC.
Note: Depending on the desktop or laptop maker, the UEFI view may differ.

Pro tip: If the Secure Boot option is greyed out, you need to set a password in BIOS. So set the password first, and then you can enable Secure Boot.
Once you have enabled Secure Boot and UEFI in Boot Mode, make sure TPM 1.2/2.0 is also enabled for your PC. So, don’t close the BIOS setup menu yet.
Enable TPM on your computer
To check Whether TPM is enabled or disabled on your computer:
Press Windows key + R, type tpm.msc and press enter key,
A window titled ‘TPM Management on Local Computer’ would open
Check whether the TPM is enabled under the ‘Status’ section
If the message shows ‘The TPM is ready for use’, it is enabled and one does not need to follow the given steps. If not enabled follow the steps given below
Note: If you are getting screen, compatible TPM cannot be found then your computer doesn’t have TPM.
Restart your computer and access BIOS screen using Esc, F1, F2, F10, F11, DEL key.
Move to the Security tab using the arrow key then locate TPM state, make sure it’s enabled. If not press enter key the select the enable option.

In addition, some of the users reported enabling Virtualization in BIOS help them fix the issue and their computer allows install windows 11 without any error. So look for “Intel Virtualization Technology” or “Virtualization Technology” or “Intel VT-x” or “AMD-V” or “SVM Mode” in your BIOS settings If found anything just enable it.
Finally, press F10 key on the keyboard to save changes and reboot your computer.
Pro Tip: if you are going to clean install Windows 11, make sure to install Windows 11 (or Windows 10) in the UEFI mode to prevent any issues in the future.


Comments