Remote desktop not working after windows 10 update? Try this 5 Solutions
- Admin

- Dec 28, 2018
- 3 min read
Windows Remote desktop is also known as Remote Desktop Services(RDS), or RDP(Remote desktop Protocol) is a very helpful feature that allows you to connect to other computers or devices that are connected to your local network or that are on the Internet and have a public IP address. But sometimes users report “Unable to connect to remote PC“, Remote desktop not working after windows 10 update, windows 10 remote desktop not available etc.
Contents
1.5 Disable IPv6 protocolRemote desktop not working Your computer can’t connect to the remote computer because a security package error occurred in the transport layer. Retry the connection or contact your network administrator for assistance. or “Unable to connect to remote PC. Please verify Remote Desktop is enabled, the remote PC is turned on and available on the network, and then try again”.
There is a various reason such as limited network connection, not enough memory, buggy update or wrong firewall settings and more that cause remote desktop failed to connect. If you are also struggling with the Remote Desktop connection problem, here 5 working solutions for you.
Check There’s a problem with the network
Before go ahead first check and Make sure that:
Your System connected to the local network, everything is okay with your Network and internet connection.
Restart your Router and PC, which fix the problem if any temporary gitch causing the issue.
The Ethernet cable is properly plugged into your network adapter, green light blinking.
Check RDC connection is allowed
If you are using the Remote Desktop Connection feature very first time, Or you have a brand new computer and looking for Access via Remote Desktop that causes you must have check RDC connection is allowed. Here how to Allow remote connections on your Windows 10 computer,
Press Windows + R, type sysdm.cpl SystemProperties and ok to open system properties.
move to Remote Tab
under Remote Assistance, checkmark Allow Remote Assistance connections to this computer.
Under Remote Desktop, select the radio button “Allow remote connection to this computer”
Click Apply and ok to make save changes.

Allow Remote Desktop Via Windows Defender Firewall
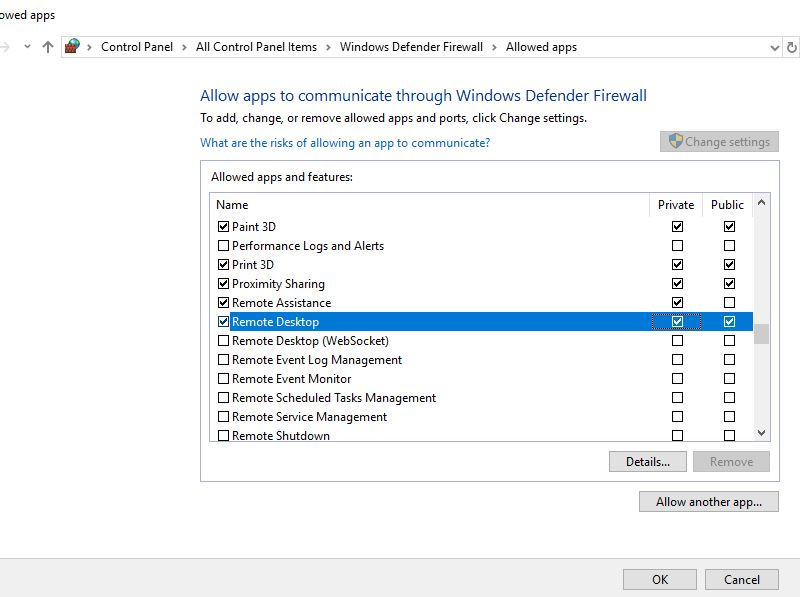
Most of the time windows firewall block remote desktop Access because of security reasons. Follow the steps below to Allow Remote Desktop via Windows Defender Firewall.
Open Windows Defender Firewall from Start menu search
Go to Allow an app or feature through Windows Firewall.

Here on the Allowed apps screen, click Change settings
Then scroll down, check the Remote Desktop entry in this list.
And make sure you’ve allowed this app for both Public and private.
Click OK to make save changes.
That’s all now Windows Defender firewall will allow you to connect to this PC remotely using the remote desktop protocol.

Check RDP dependency services
Press Windows + R, type services.msc and ok
In the Services window, scroll down and check the status of every service having “remote” term in their name.
All of these services should be set either to Manual or Automatic
And make sure none of them should have Disabled status.
Once you confirmed this, RDC will start working as expected.

Disable IPv6 protocol
Disable IPv6 (internet protocol version) one of the most effective solutions, that help most users to Fix Remote Desktop connection problems.
Press Windows + R, type ncpa.cpl and ok
On network connections windows, Right-click on the active network adapter and select properties.
Look for the checkbox which says Internet Protocol Version 6 (TCP/IPv6), uncheck it.
Click on OK, and restart your computer.
Did these solutions help to fix Windows 10 Remote Desktop connection problems? Let us know on the comments below,
Also read


Comments